Outlook 2003 / 2007 / 2010 / 2013 Configuration using POP3 settings
Estimated Reading Time: 2 MinutesÂ
Outlook 2003 / 2007 / 2010 / 2013 Configuration using POP3 settings
1.   Open Outlook and select Manual setup or additional Server types
Open outlook for the first time if this is not your first time open Control Panel, then open Mail and select E-mail Accounts if you updating a configuration or Show Profiles if you would like to create a new email profile.

Â
2.   Select POP or IMAP

Â
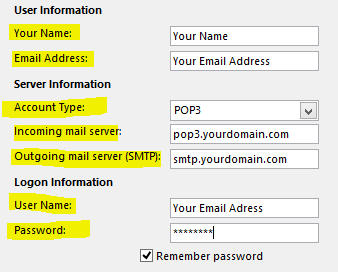
3.   Fill out settings
Â
| Â | Â | Â | Â |
| Â | Â Fill in the blanks: |
(Replace domain.com with everything following the @ symbol in your email address. i.e. HanSolo@MFalcon.biz => pop3.MFalcon.biz)
 (i.e. smtp.MFalcon.biz)
 (The email address you entered previously under E-mail Address.)
|
|
| Â | Â
|
||
| Â | |||
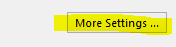
4.   Then Click More Settings
Â
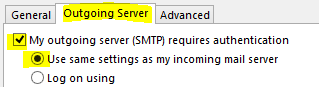
5.   Click on the Outgoing Server
Once the Internet Email Settings window comes up, click on the Outgoing Server tab and place a check into the box that reads “My outgoing (SMTP) server requires authentication.“
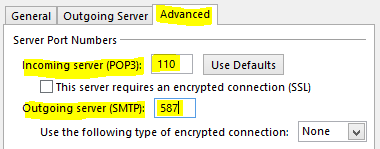
6.   Click on the Advanced Tab
At the advanced tab, change the Outgoing server (SMTP) port from 25 to 587 then click OK.
Â
7.   You can now click Finished.
Click Close and launch Outlook. In Outlook send yourself an email as a congratulations (also as a test). Click Send and Receive. If you received your own email, everything has been configured correctly. If not, please go back and make sure all the settings are correct and you entered in your password correctly.